The Art of Application: A Comprehensive Guide to Makeup Steps in Order
Related Articles: The Art of Application: A Comprehensive Guide to Makeup Steps in Order
Introduction
In this auspicious occasion, we are delighted to delve into the intriguing topic related to The Art of Application: A Comprehensive Guide to Makeup Steps in Order. Let’s weave interesting information and offer fresh perspectives to the readers.
Table of Content
The Art of Application: A Comprehensive Guide to Makeup Steps in Order

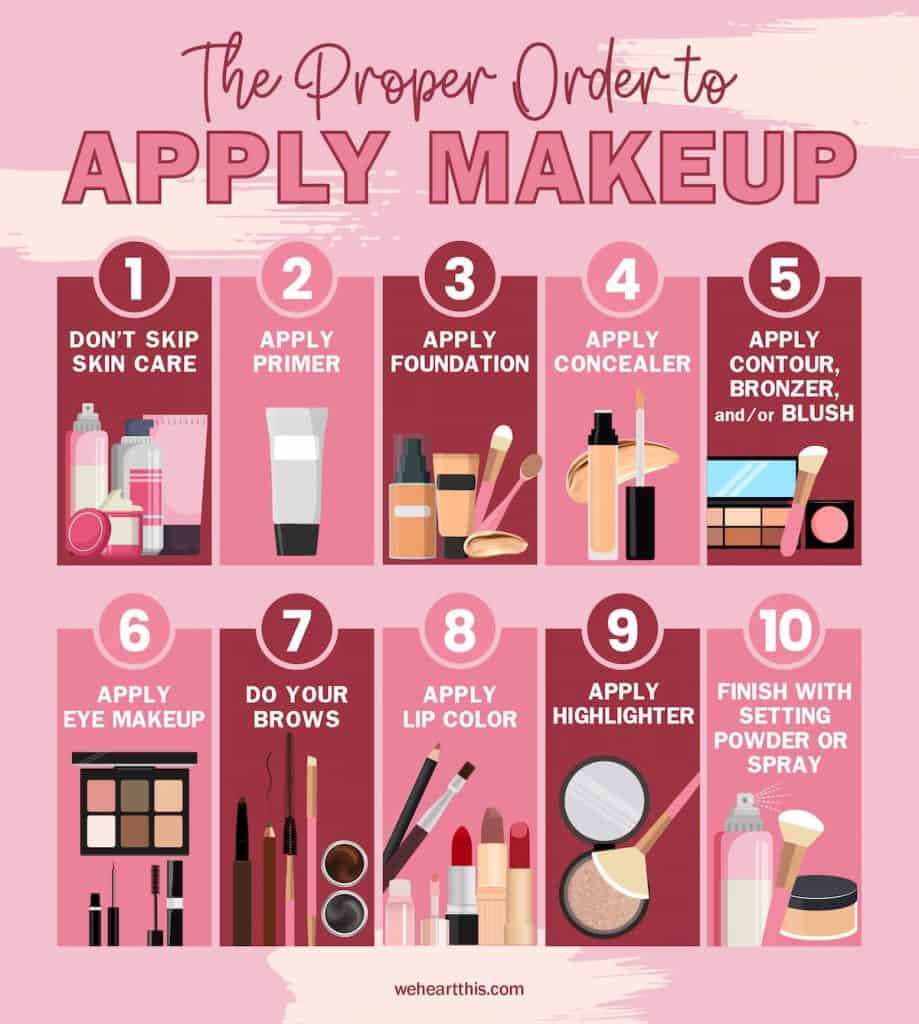
The world of makeup is a vast and ever-evolving landscape, offering a myriad of products and techniques to enhance natural beauty and express individual style. While the specific steps and products used may vary based on individual preferences and desired outcomes, a foundational understanding of the order in which these steps are typically executed is crucial for achieving a polished and harmonious look. This guide provides a comprehensive overview of the makeup application process, outlining each step in detail and highlighting its importance within the overall aesthetic.
1. Skin Preparation: The Foundation for Flawless Application
Before embarking on the actual application of makeup, it is essential to establish a smooth and even canvas for the products to adhere to. This involves a multi-step process that ensures optimal absorption and longevity:
a. Cleansing:
- Importance: Removing dirt, oil, and impurities accumulated throughout the day is paramount for preventing clogged pores, breakouts, and uneven application.
- Method: Choose a gentle cleanser appropriate for your skin type. Apply a small amount to damp skin, massage gently in circular motions, and rinse thoroughly with lukewarm water. Pat dry with a clean towel.
b. Exfoliation:
- Importance: Exfoliation removes dead skin cells, revealing brighter and smoother skin, allowing for more even makeup application.
- Method: Opt for a physical or chemical exfoliant based on your skin’s sensitivity. Physical exfoliants use granules to scrub away dead cells, while chemical exfoliants rely on acids to dissolve them. Use exfoliants 1-2 times per week to avoid over-exfoliation.
c. Toning:
- Importance: Toners help restore the skin’s pH balance, tighten pores, and prepare the skin for subsequent products.
- Method: Apply toner with a cotton pad, gently sweeping it across the face after cleansing and exfoliating. Avoid the delicate eye area.
d. Moisturizing:
- Importance: Hydration is crucial for a healthy and supple complexion, which is essential for optimal makeup application.
- Method: Choose a moisturizer appropriate for your skin type. Apply a thin layer to the entire face, allowing it to absorb completely before proceeding to the next step.
e. Primer:
- Importance: Primer acts as a barrier between the skin and makeup, creating a smooth surface that minimizes the appearance of pores and fine lines, extending the wear of foundation, and preventing creasing.
- Method: Apply a small amount of primer to the face, focusing on areas prone to oiliness or dryness. Blend thoroughly with fingertips or a makeup brush.
2. Foundation: The Canvas for Color
Foundation serves as the base for all subsequent makeup application, providing an even skin tone and creating a blank canvas for further enhancements.
a. Color Matching:
- Importance: Choosing the right foundation shade is critical for achieving a natural-looking result.
- Method: Test foundation shades on your jawline or inner arm, ensuring the color blends seamlessly with your natural skin tone.
b. Application:
- Importance: Applying foundation correctly ensures a flawless, even finish.
-
Method: Choose your preferred application method:
- Fingers: Warmth from your fingertips allows for a more natural finish.
- Sponge: Provides a light and blended application, minimizing the appearance of streaks.
- Brush: Creates a smooth, airbrushed effect.
- Technique: Start from the center of the face and blend outwards, extending to the neck and décolletage for a seamless transition.
3. Concealer: Targeting Imperfections
Concealer is used to camouflage blemishes, dark circles, and other imperfections, enhancing the overall complexion.
a. Color Selection:
- Importance: Choosing the right concealer color depends on the type of imperfection being addressed.
-
Method:
- Green: Neutralizes redness.
- Yellow: Brightens dark circles.
- Peach: Corrects sallowness.
- Purple: Neutralizes yellow tones.
b. Application:
- Importance: Applying concealer correctly minimizes the appearance of imperfections.
-
Method:
- Dab: Apply concealer directly to the targeted area with a small brush or sponge.
- Blend: Use a sponge or brush to gently blend the edges of the concealer, ensuring a seamless transition.
4. Powder: Setting the Foundation
Powder is used to set foundation, absorb excess oil, and create a matte finish, extending the longevity of makeup throughout the day.
a. Type Selection:
- Importance: Different types of powder cater to various skin types and preferences.
-
Method:
- Loose powder: Offers a light and airy finish, ideal for dry skin.
- Pressed powder: Provides a more pigmented and buildable coverage, suitable for oily skin.
b. Application:
- Importance: Proper application ensures a natural-looking and even finish.
- Method: Use a large, fluffy brush to apply powder to the entire face, focusing on the T-zone (forehead, nose, and chin) and areas prone to oiliness.
5. Eyeshadow: Enhancing the Eyes
Eyeshadow is used to add depth, dimension, and color to the eyelids, highlighting the eyes and enhancing their natural shape.
a. Palette Selection:
- Importance: Choosing a palette that complements your skin tone and desired eye look is key.
- Method: Consider neutral shades for everyday wear, while bolder colors can be used for special occasions.
b. Application:
- Importance: Applying eyeshadow correctly creates a seamless and flattering effect.
-
Method:
- Base: Apply a light, neutral shade to the entire eyelid as a base.
- Crease: Use a darker shade to define the crease of the eyelid, blending it outwards.
- Highlight: Apply a shimmery or light shade to the brow bone for a brightening effect.
6. Eyeliner: Defining the Eyes
Eyeliner is used to define the lash line, create a dramatic effect, and enhance the shape and size of the eyes.
a. Type Selection:
- Importance: Different eyeliner types offer varying levels of intensity and longevity.
-
Method:
- Pencil: Provides a softer and more forgiving application, ideal for beginners.
- Liquid: Offers a more precise and dramatic effect, suitable for those with steadier hands.
- Gel: Provides a smooth and long-lasting application, offering a balance of precision and forgiveness.
b. Application:
- Importance: Applying eyeliner correctly ensures a defined and polished look.
-
Method:
- Upper Lash Line: Apply eyeliner along the upper lash line, starting from the inner corner of the eye and extending outwards.
- Lower Lash Line: Apply eyeliner along the lower lash line, starting from the outer corner and blending inwards.
7. Mascara: Lengthening and Thickening Lashes
Mascara is used to enhance the appearance of lashes, adding length, volume, and definition.
a. Type Selection:
- Importance: Different types of mascara cater to specific lash needs and preferences.
-
Method:
- Lengthening: Focuses on extending the length of lashes.
- Volumizing: Enhances the thickness and fullness of lashes.
- Waterproof: Resists smudging and running, ideal for humid or active days.
b. Application:
- Importance: Applying mascara correctly prevents clumping and ensures even coverage.
-
Method:
- Wiggle: Wiggle the mascara wand from the base of the lashes to the tips, ensuring even coverage.
- Layer: Apply multiple coats for added volume and definition, allowing each coat to dry completely before applying the next.
8. Brows: Framing the Face
Brows play a crucial role in framing the face and enhancing the overall aesthetic.
a. Shaping and Filling:
- Importance: Well-defined and sculpted brows create a balanced and harmonious look.
-
Method:
- Tweezing: Remove stray hairs to create a clean and defined brow shape.
- Pencil or Powder: Fill in sparse areas with a brow pencil or powder, matching the natural hair color.
- Gel: Set brows in place with a clear or tinted brow gel.
9. Blush: Adding a Flush of Color
Blush is used to add a natural-looking flush of color to the cheeks, enhancing the complexion and creating a youthful glow.
a. Color Selection:
- Importance: Choosing the right blush color depends on your skin tone and desired effect.
-
Method:
- Pink: Creates a natural and rosy glow.
- Peach: Adds a warm and healthy flush.
- Coral: Provides a vibrant and summery look.
b. Application:
- Importance: Applying blush correctly ensures a natural-looking and blended finish.
-
Method:
- Smile: Smile to identify the apples of your cheeks.
- Apply: Apply blush to the apples of your cheeks and blend upwards towards the temples.
10. Highlighter: Adding Dimension and Glow
Highlighter is used to accentuate certain areas of the face, creating a luminous and radiant effect.
a. Placement:
- Importance: Strategic placement of highlighter enhances facial features and creates a sculpted look.
-
Method:
- Brow Bone: Brightens the brow bone and opens up the eyes.
- Cheekbones: Adds definition and dimension to the cheekbones.
- Cupid’s Bow: Creates a fuller and more defined lip shape.
b. Application:
- Importance: Applying highlighter correctly ensures a natural-looking and subtle glow.
-
Method:
- Dab: Apply highlighter with a small brush or sponge to the desired areas.
- Blend: Blend the highlighter gently with fingertips or a brush, creating a seamless transition.
11. Lipstick or Lip Gloss: Adding Color and Shine
Lipstick and lip gloss are used to add color, shine, and definition to the lips, completing the overall makeup look.
a. Color Selection:
- Importance: Choosing the right lip color depends on your skin tone, personal style, and the occasion.
-
Method:
- Nudes: Create a natural and understated look.
- Reds: Add a bold and classic touch.
- Pinks: Offer a feminine and flattering option.
b. Application:
- Importance: Applying lipstick or lip gloss correctly ensures a precise and long-lasting finish.
-
Method:
- Outline: Use a lip liner to define the lip shape and prevent bleeding.
- Fill: Fill in the lips with lipstick or lip gloss, applying evenly from the center outwards.
FAQs by All Makeup Steps in Order
Skin Preparation:
-
Q: Can I skip cleansing if I’m in a rush?
- A: Cleansing is crucial for removing dirt, oil, and impurities, which can interfere with makeup application and lead to breakouts. It is not advisable to skip this step, even if you are short on time.
-
Q: How often should I exfoliate?
- A: Exfoliate 1-2 times per week for optimal results without over-exfoliating.
-
Q: Do I need to use a toner?
- A: Toners help restore the skin’s pH balance and prepare it for subsequent products. While not strictly necessary, they can enhance the effectiveness of your skincare routine.
-
Q: What type of moisturizer should I use?
- A: Choose a moisturizer appropriate for your skin type. Oily skin benefits from a light and oil-free formula, while dry skin requires a richer and more hydrating product.
-
Q: Is primer really necessary?
- A: Primer creates a smooth surface that minimizes the appearance of pores and fine lines, extending the wear of foundation and preventing creasing. While not mandatory, it significantly enhances the overall makeup application.
Foundation:
-
Q: How do I find my perfect foundation shade?
- A: Test foundation shades on your jawline or inner arm, ensuring the color blends seamlessly with your natural skin tone. Look for a match in both daylight and artificial light.
-
Q: What is the best way to apply foundation?
- A: Choose your preferred application method: fingers, sponge, or brush. Each method offers unique benefits, so experiment to find what works best for you.
-
Q: Can I use foundation as concealer?
- A: Foundation is designed to even out skin tone, while concealer is specifically formulated to target imperfections. Using foundation as concealer may not provide adequate coverage.
Concealer:
-
Q: How do I choose the right concealer color?
- A: Select a concealer color based on the type of imperfection being addressed. Green neutralizes redness, yellow brightens dark circles, peach corrects sallowness, and purple neutralizes yellow tones.
-
Q: Should I apply concealer before or after foundation?
- A: The order of application depends on your preference and the desired effect. Applying concealer before foundation can provide more targeted coverage, while applying it after can create a more seamless finish.
Powder:
-
Q: What type of powder is best for my skin type?
- A: Loose powder offers a light and airy finish, ideal for dry skin, while pressed powder provides a more pigmented and buildable coverage, suitable for oily skin.
-
Q: How much powder should I use?
- A: Start with a small amount and build up coverage as needed. Too much powder can create a cakey or unnatural finish.
Eyeshadow:
-
Q: How do I choose eyeshadow colors that complement my skin tone?
- A: Warm skin tones look best with warm eyeshadow colors like browns, oranges, and golds. Cool skin tones are flattered by cool colors like blues, greens, and purples.
-
Q: How do I blend eyeshadow smoothly?
- A: Use a soft, fluffy brush to blend eyeshadows back and forth in a circular motion, ensuring a seamless transition between shades.
Eyeliner:
-
Q: What type of eyeliner is best for beginners?
- A: Pencil eyeliner provides a softer and more forgiving application, ideal for those new to eyeliner.
-
Q: How do I create a winged eyeliner look?
- A: Start with a thin line along the upper lash line, extending it outwards in a wing shape. Use a small angled brush to create a sharp and defined wing.
Mascara:
-
Q: How do I prevent mascara from clumping?
- A: Wiggle the mascara wand from the base of the lashes to the tips, ensuring even coverage. Avoid pumping the wand, as this can introduce air into the tube, causing the mascara to dry out and clump.
-
Q: How do I remove mascara without irritating my eyes?
- A: Use a gentle eye makeup remover and a cotton pad. Hold the cotton pad over your closed eye for a few seconds to soften the mascara before gently wiping it away.
Brows:
-
Q: How do I find the perfect brow shape?
- A: A professional brow shaping service can help you determine the best brow shape for your face. Alternatively, use a brow pencil to map out the desired shape before tweezing.
-
Q: How do I fill in my brows naturally?
- A: Use a brow pencil or powder that matches your natural hair color. Apply light, feathery strokes to mimic the appearance of natural brow hairs.
Blush:
-
Q: How do I find the right blush color for my skin tone?
- A: Warm skin tones look best with peachy and coral blushes, while cool skin tones are flattered by pink and rose blushes.
-
Q: How do I apply blush without looking clownish?
- A: Apply blush to the apples of your cheeks and blend upwards towards the temples. Start with a small amount and build up coverage as needed.
Highlighter:
-
Q: Where should I apply highlighter?
- A: Apply highlighter to the brow bone, cheekbones, cupid’s bow, and the inner corners of the eyes.
-
Q: How do I avoid looking too glittery?
- A: Use a light hand when applying highlighter and blend it thoroughly to create a subtle and natural glow.
Lipstick or Lip Gloss:
-
Q: How do I choose the right lip color for my skin tone?
- A: Fair skin tones look best with light and neutral lip colors, while olive skin tones can wear a wider range of colors. Darker skin tones can rock bold and vibrant shades.
-
Q: How do I prevent lipstick from bleeding?
- A: Use a lip liner to define the lip shape and prevent bleeding. Apply lipstick evenly, starting from the center of the lips and working outwards.
Tips by All Makeup Steps in Order
Skin Preparation:
- Tip: Use lukewarm water for cleansing and rinsing, as hot water can strip the skin of its natural oils.
- Tip: Exfoliate gently, avoiding harsh scrubbing that can irritate the skin.
- Tip: Apply moisturizer to damp skin for enhanced absorption.
- Tip: Apply primer to the entire face, even if you are only using foundation on certain areas.
Foundation:
- Tip: Apply foundation in thin layers, building up coverage as needed.
- Tip: Blend foundation seamlessly into the hairline, neck, and décolletage for a natural-looking finish.
- Tip: Use a damp sponge to create a more airbrushed effect.
Concealer:
- Tip: Apply concealer in a triangle shape under the eyes to brighten and lift the area.
- Tip: Use a small brush or sponge to apply concealer directly to blemishes.
- Tip: Set concealer with a translucent powder to prevent creasing.
Powder:
- Tip: Use a large, fluffy brush to apply powder for a light and diffused finish.
- Tip: Apply powder in a "C" shape around the face, focusing on the T-zone.
- Tip: Avoid applying powder directly to the under-eye area, as this can emphasize fine lines.
Eyeshadow:
- Tip: Use a light hand when applying eyeshadow, building up color gradually.
- Tip: Blend eyeshadows thoroughly to create a seamless transition between shades.
- Tip: Use a small brush to


Closure
Thus, we hope this article has provided valuable insights into The Art of Application: A Comprehensive Guide to Makeup Steps in Order. We thank you for taking the time to read this article. See you in our next article!