The Art of Application: A Comprehensive Guide to Makeup
Related Articles: The Art of Application: A Comprehensive Guide to Makeup
Introduction
With enthusiasm, let’s navigate through the intriguing topic related to The Art of Application: A Comprehensive Guide to Makeup. Let’s weave interesting information and offer fresh perspectives to the readers.
Table of Content
The Art of Application: A Comprehensive Guide to Makeup
Makeup, a powerful tool for enhancing natural features and expressing individual style, requires a thoughtful approach to application. This guide provides a step-by-step breakdown of the makeup application process, offering insights into each stage and highlighting its importance in achieving a polished and harmonious look.
Step 1: Skin Preparation – The Foundation for Flawless Finish
Before embarking on the makeup application journey, preparing the skin is paramount. A well-prepped canvas allows makeup to adhere smoothly and last longer. This step involves cleansing, toning, and moisturizing, each playing a crucial role in achieving optimal results.
- Cleansing: This step removes dirt, oil, and impurities accumulated throughout the day, ensuring a clean base for makeup application. Choose a cleanser suited to your skin type – oily, dry, combination, or sensitive – for optimal results.
- Toning: Applying toner after cleansing helps to balance the skin’s pH level, tighten pores, and minimize the appearance of blemishes. It also prepares the skin to receive the benefits of the moisturizer.
- Moisturizing: Hydrating the skin is essential for makeup application. Moisturizer creates a smooth surface for makeup to glide on, preventing creasing and dryness. Select a moisturizer based on your skin type and specific needs, such as anti-aging or sun protection.
Step 2: Primer – The Canvas for a Smooth Finish
Primer acts as a barrier between the skin and makeup, creating a smooth and even surface for foundation application. It helps to minimize the appearance of pores, fine lines, and wrinkles, while also extending the wear of makeup.
- Types of Primers: Primers are available in various formulas, catering to specific needs. Mattifying primers control oil production, blurring primers minimize the appearance of imperfections, and hydrating primers add moisture to dry skin.
- Application: Apply a thin layer of primer evenly across the face, focusing on areas prone to shine or imperfections. Allow it to dry completely before proceeding to the next step.
Step 3: Foundation – The Base for a Flawless Complexion
Foundation provides a uniform base for the complexion, concealing imperfections and evening out skin tone. Selecting the right foundation shade is crucial for achieving a natural and seamless look.
- Choosing the Right Shade: Test foundation shades on your jawline, blending it into your skin to determine the perfect match. Ensure the shade seamlessly blends into your natural skin tone, avoiding any obvious lines or demarcation.
- Application Techniques: Apply foundation using a brush, sponge, or your fingertips, depending on your preference and desired coverage. Blend thoroughly for a natural finish, paying attention to the hairline and jawline to avoid any harsh lines.
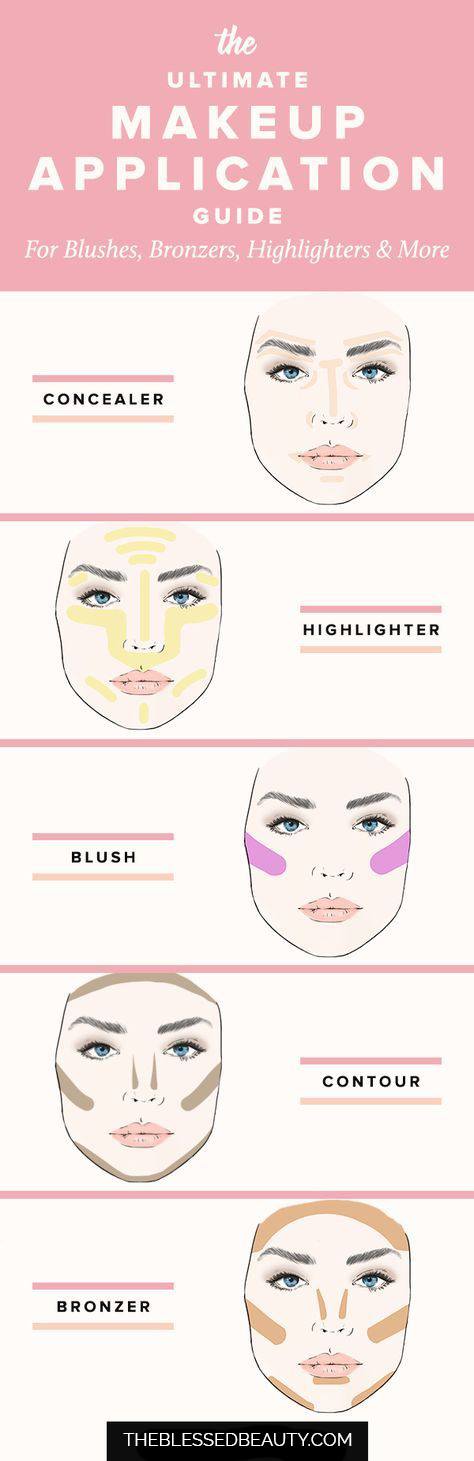
Step 4: Concealer – Targeted Coverage for Imperfections
Concealer is used to cover specific imperfections, such as dark circles, blemishes, and redness. Its targeted application allows for precise coverage, enhancing the overall complexion.
- Choosing the Right Shade: Select a concealer shade that is one to two shades lighter than your foundation for brightening and highlighting purposes, or a shade that matches your skin tone for concealing blemishes.
- Application Techniques: Apply concealer using a small brush or your ring finger, dabbing it gently onto the targeted areas. Blend thoroughly with a sponge or brush for a seamless finish.
Step 5: Setting Powder – Locking in the Look
Setting powder helps to set the foundation and concealer, preventing creasing and shine. It also mattifies the complexion, providing a long-lasting and flawless finish.
- Types of Setting Powders: Loose powder offers a lighter coverage, while pressed powder provides a more opaque finish. Choose a powder that matches your skin tone for a natural look.
- Application Techniques: Apply setting powder using a large brush, gently pressing it onto the face, focusing on the T-zone and other areas prone to shine.
Step 6: Blush – Adding a Flush of Color
Blush adds a natural flush of color to the cheeks, enhancing the complexion and creating a healthy glow. It can also sculpt the face, adding dimension and definition.
- Choosing the Right Shade: Select a blush shade that complements your skin tone and desired look. Peachy or coral shades enhance warm skin tones, while pink or rose shades flatter cool skin tones.
- Application Techniques: Apply blush using a brush, sweeping it onto the apples of the cheeks and blending upwards towards the temples.
Step 7: Bronzer – Defining and Warming the Complexion
Bronzer adds warmth and dimension to the face, creating a sun-kissed glow. It can also be used to contour the face, defining cheekbones and jawline.
- Choosing the Right Shade: Select a bronzer shade that is one to two shades darker than your natural skin tone. Avoid bronzers that are too orange or red, as they can look unnatural.
- Application Techniques: Apply bronzer using a large brush, sweeping it along the cheekbones, temples, and jawline. Blend thoroughly for a natural finish.
Step 8: Eyeshadow – Enhancing the Eyes
Eyeshadow adds color and depth to the eyes, enhancing their natural beauty. It can also be used to create a variety of looks, from subtle to dramatic.
- Choosing the Right Shades: Select eyeshadow shades that complement your eye color and desired look. Neutral shades, such as browns and beiges, are versatile and flattering on most eye colors.
- Application Techniques: Apply eyeshadow using a brush, starting with a light shade on the lid and blending upwards towards the crease. Use a darker shade in the crease to add depth and definition.
Step 9: Eyeliner – Defining and Enlarging the Eyes
Eyeliner defines the shape of the eyes, making them appear larger and more prominent. It can also be used to create a variety of looks, from subtle to dramatic.
- Types of Eyeliners: Liquid eyeliner provides a precise and intense line, while pencil eyeliner is easier to blend and smudge. Choose the type of eyeliner that best suits your skills and desired look.
- Application Techniques: Apply eyeliner using a steady hand, starting at the inner corner of the eye and extending outwards towards the outer corner. For a more dramatic look, wing the eyeliner upwards at the outer corner.
Step 10: Mascara – Adding Volume and Length
Mascara adds volume and length to the lashes, making them appear fuller and more defined. It also enhances the overall eye look, adding a touch of drama.
- Choosing the Right Mascara: Select a mascara that meets your specific needs, such as volumizing, lengthening, or curling. Consider your lash type and desired look when making your choice.
- Application Techniques: Apply mascara using a wiggling motion from the root of the lashes to the tips. Use multiple coats for a more dramatic look, allowing each coat to dry before applying the next.
Step 11: Lipstick – Adding Color and Defining the Lips
Lipstick adds color and definition to the lips, enhancing their natural beauty. It can also be used to create a variety of looks, from subtle to bold.
- Choosing the Right Shade: Select a lipstick shade that complements your skin tone and desired look. Neutral shades, such as nude and pink, are versatile and flattering on most skin tones.
- Application Techniques: Apply lipstick using a brush or directly from the tube, starting at the center of the lips and working outwards towards the corners.
Step 12: Setting Spray – Locking in the Look
Setting spray helps to set the makeup, preventing it from smudging or fading throughout the day. It also adds a dewy or matte finish, depending on the type of spray used.
- Types of Setting Sprays: Matte setting sprays control shine and provide a long-lasting finish, while dewy setting sprays add a radiant glow. Choose the type of setting spray that best suits your skin type and desired look.
- Application Techniques: Hold the setting spray about 6-8 inches away from your face and mist evenly, closing your eyes to avoid getting spray in them. Allow it to dry completely before touching your face.
FAQs: Addressing Common Makeup Concerns
Q: What is the best way to choose the right foundation shade?
A: Test foundation shades on your jawline, blending it into your skin to determine the perfect match. Ensure the shade seamlessly blends into your natural skin tone, avoiding any obvious lines or demarcation.
Q: How can I prevent my makeup from creasing?
A: Properly prepare your skin by cleansing, toning, and moisturizing. Apply a primer before foundation to create a smooth surface for makeup application. Use a setting powder to set your foundation and concealer, and avoid using too much product.
Q: How can I make my eyes appear larger?
A: Use a light eyeshadow shade on the lid and a darker shade in the crease to add depth and definition. Apply eyeliner along the lash line, extending it slightly outwards at the outer corner. Curl your lashes and apply mascara.
Q: How can I create a natural-looking makeup look?
A: Choose makeup shades that closely match your skin tone and avoid using too much product. Blend everything thoroughly for a seamless finish.
Tips for Achieving a Flawless Makeup Application
- Clean Your Brushes Regularly: Dirty brushes can harbor bacteria and transfer product unevenly, leading to uneven application and breakouts.
- Use Natural Lighting: Natural light provides the best illumination for applying makeup, allowing you to see your skin tone and makeup shades accurately.
- Practice Makes Perfect: Makeup application takes time and practice to master. Don’t be afraid to experiment with different techniques and products to find what works best for you.
- Less is More: Start with a light application of makeup and gradually build up coverage as needed. It’s easier to add more product than it is to remove it.
Conclusion: The Power of Makeup
Applying makeup is an art form, a process of enhancing natural features and expressing individual style. By following these steps and incorporating the tips provided, you can achieve a polished and harmonious look that reflects your unique personality. Remember, makeup is a tool for empowerment, allowing you to feel confident and beautiful in your own skin. Embrace the power of makeup and use it to express yourself authentically.


Closure
Thus, we hope this article has provided valuable insights into The Art of Application: A Comprehensive Guide to Makeup. We appreciate your attention to our article. See you in our next article!